Apple Crisp Recipe
Table of Contents
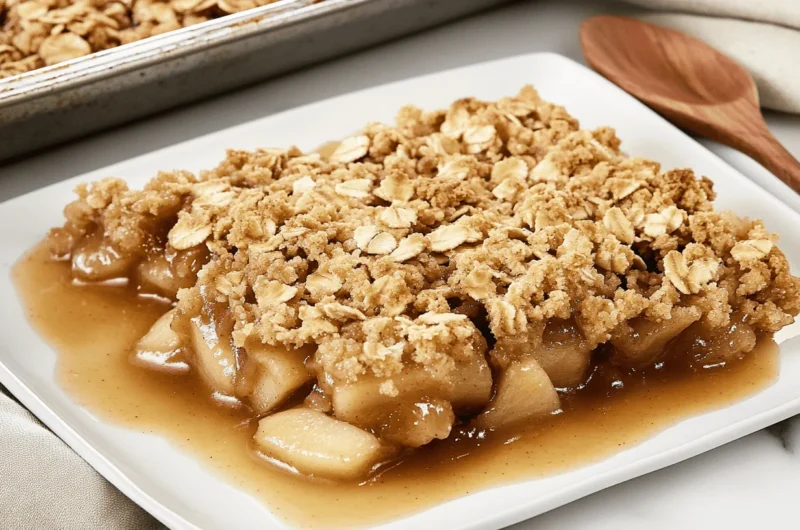
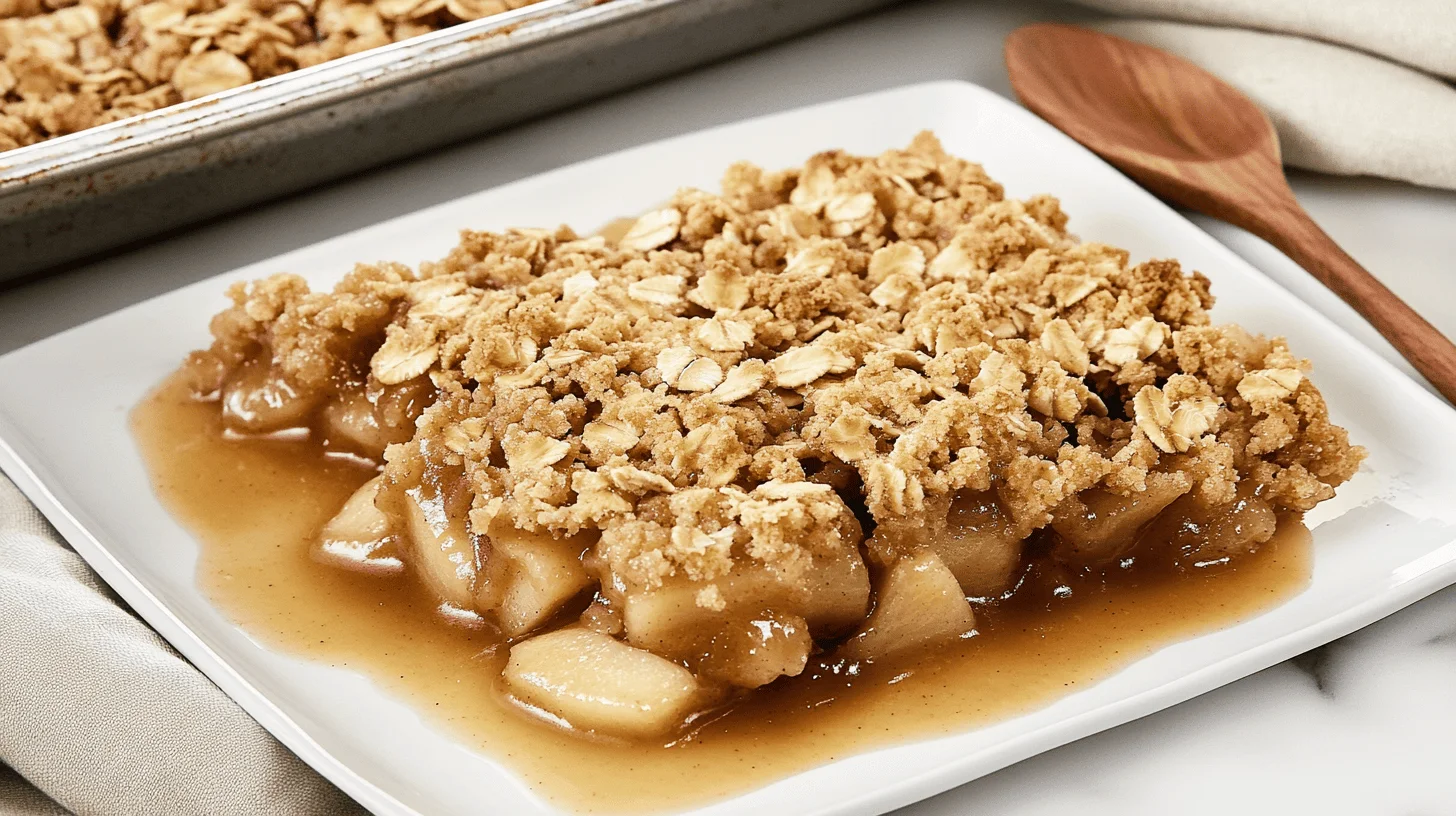
There’s something almost magical about the way Apple Crisp transforms the ordinary apple into a symphony of warm, spiced perfection. As autumn leaves begin their chromatic dance from green to gold, this dessert emerges from ovens across the country, filling homes with an aroma that whispers of comfort and nostalgia. The beauty of Apple Crisp lies in its magnificent simplicity: tender, caramelized apples nestled beneath a blanket of buttery, crumbly topping that crisps to golden perfection. Unlike its more complicated cousin, the double-crust apple pie, this dessert forgives the imperfect baker while rewarding minimal effort with maximum flavor. My grandmother used to say that while anyone could follow a recipe, it took heart to make an Apple Crisp that spoke to the soul. Perhaps that’s why, despite featuring dozens of apple desserts on this blog (my apple butter bars being a particular reader favorite), I return to this humble classic year after year. Join me as we explore not just the foundations of this beloved dessert but ten extraordinary ways to elevate it from delicious to utterly unforgettable.
What is Apple Crisp?
Ever wondered why something so gloriously bubbly and tender gets called a “crisp”? The delightful contradiction in this dessert’s name comes from that irresistible contrast between the softened, juicy apples below and that crunchy, oat-studded topping above. Apple Crisp emerged in American cookbooks during the Great Depression, when home cooks sought economical alternatives to pie that didn’t sacrifice comfort or flavor. Unlike its cousins the cobbler with biscuit-like toppings or the British crumble (typically without oats), our beloved Apple Crisp champions that perfect textural interplay that makes you close your eyes with each bite. As my grandfather used to quip, “The way to anyone’s heart is through their stomach, but the express route involves Apple Crisp!” Ready to create a dessert that will have your family scraping the dish clean? Let’s get baking!
Why You’ll Love This Apple Crisp:
This Apple Crisp recipe transcends ordinary desserts through its perfect balance of simplicity and splendor. First and foremost, the star of the show is the magical transformation that happens in your oven: apples softening into tender, caramel-like morsels while maintaining just enough structure to avoid mushiness. Each bite delivers that perfect contrast between fruit and topping that makes you come back for “just one more spoonful” until the dish mysteriously empties.
Beyond the incredible flavor, making Apple Crisp at home saves you significantly compared to bakery prices. While a modest bakery version might cost $6-8 per serving, this entire recipe feeds 8-10 people for about $10 total in ingredients. The financial wisdom continues as this recipe utilizes pantry staples you likely already have on hand: flour, oats, sugar, and butter form the foundation of that irresistible topping.
The real genius comes from the customizable toppings and mix-ins. Whether you’re adding chopped walnuts for extra crunch, drizzling with homemade caramel sauce, or serving alongside a scoop of vanilla bean ice cream that melts into warm crevices, each variation creates an entirely new experience. While my oatmeal cookies recipe remains popular, this Apple Crisp consistently receives more enthusiastic reviews for its perfect texture and adaptability. Ready to discover your favorite way to enjoy this classic? Let’s head to the kitchen and create some autumn magic!
How to Make Apple Crisp:
Quick Overview
This Apple Crisp delivers everything you crave in a fall dessert: tender, cinnamon-spiced apples nestled beneath a buttery, crunchy oat topping that browns to perfection. What makes this version special is the pre-cooking technique that ensures your apples achieve that perfect texture: never too firm, never too mushy. The entire process takes just 15 minutes of active preparation time, with about 35 minutes of baking, meaning warm, fresh Apple Crisp can be yours in under an hour!
10 Ways to Elevate Your Apple Crisp
1. The Bourbon Infusion Method
Transform your Apple Crisp into a sophisticated dessert experience by incorporating bourbon into both the filling and topping. For the filling, add 2 tablespoons of quality bourbon when tossing your apples with lemon juice and spices. The alcohol will cook off, leaving behind complex caramel and vanilla notes that enhance the natural sweetness of the apples. For the topping, mix 1 tablespoon of bourbon into your melted butter before incorporating it into the dry ingredients. This creates aromatic pockets of flavor that bloom when baked.
What makes this technique special is how the bourbon amplifies the caramelization process. The sugars in both the bourbon and apples create deeper, more complex flavor compounds during baking. This variation pairs exceptionally well with a scoop of vanilla bean ice cream, where the cold creaminess provides the perfect counterpoint to the warm, bourbon-kissed apples.
2. The Spice Cabinet Symphony
Elevate your Apple Crisp by creating a custom spice blend that goes beyond basic cinnamon. While traditional recipes rely heavily on cinnamon alone, a thoughtfully constructed spice blend adds remarkable depth and complexity. Combine 1 teaspoon cinnamon with 1/4 teaspoon each of freshly grated nutmeg, ground cardamom, and ground ginger, plus a tiny pinch (1/8 teaspoon) of ground cloves.
The magic happens as these spices interact with the apples during baking. Nutmeg adds a warm, aromatic quality, cardamom contributes a subtle citrusy brightness, ginger provides a gentle heat that enhances sweetness, and cloves deliver that quintessential autumn richness. For maximum flavor impact, toast your spice blend in a dry skillet for 30 seconds before adding to your apple mixture this quick step awakens the essential oils in the spices, dramatically intensifying their flavor contribution.
3. The Salted Caramel Integration
Introduce a transformative flavor dimension to your Apple Crisp with homemade salted caramel sauce incorporated in multiple ways. First, drizzle 1/3 cup of slightly cooled salted caramel sauce over your seasoned apples before adding the topping. During baking, this caramel melts into the apple juices, creating pockets of rich, buttery sweetness throughout the filling.
For the topping, add 2 tablespoons of caramel to your melted butter before mixing with the dry ingredients. This creates a topping that develops an almost cookie-like texture in spots, with beautiful caramelized edges. Finally, reserve additional caramel sauce for serving, warming it slightly so it drizzles perfectly over each portion. The contrast between the warm Apple Crisp, cold ice cream (if serving), and silky caramel sauce creates an unforgettable textural experience that elevates this humble dessert to restaurant-quality status.
4. The Unexpected Cheese Element
Introduce an unexpected savory element to your Apple Crisp by incorporating aged cheddar into the topping. While this might sound unusual, the pairing of sharp cheddar with sweet apples has deep culinary roots, particularly in New England and British traditions. Add 1/2 cup of finely grated aged cheddar (at least 1 year old for best flavor) to your oat topping mixture.
The cheese melts slightly during baking, creating pockets of savory richness that beautifully complement the sweet-tart apples. The proteins in the cheese also promote additional browning, resulting in a topping with exceptional color and crispy texture. This variation is particularly stunning with tart apple varieties like Granny Smith or Pink Lady, where the acidity balances perfectly with the rich cheese. For an extra sophisticated presentation, garnish each serving with a small wedge of cheddar and a drizzle of honey.
5. The Citrus Zest Enhancement
Brighten your Apple Crisp with the vibrant flavor of citrus zest, which acts as a flavor multiplier for the entire dessert. Add the finely grated zest of one orange or lemon to your apple mixture before baking. The essential oils in the zest infuse throughout the filling, adding a subtle complexity that heightens the apples’ natural flavor without overwhelming it.
For an even more pronounced effect, mix additional zest into your topping mixture. The heat of baking releases the volatile compounds in the zest, creating an intoxicating aroma and bright flavor notes that cut through the richness of the butter and brown sugar. This technique works particularly well when your apples are very sweet, as the citrus provides a balancing acidic note that prevents the dessert from becoming cloying. For maximum impact, consider using Meyer lemons or blood oranges when in season.
6. The Nut Butter Revolution
Transform the texture and flavor profile of your Apple Crisp by incorporating nut butter into both components of the dessert. For the filling, gently heat 3 tablespoons of almond butter, cashew butter, or peanut butter until just pourable, then drizzle over your seasoned apples. During baking, the nut butter melts into the apple juices, creating a rich, creamy sauce with remarkable depth.
For the topping, substitute 1/4 cup of your chosen nut butter for an equal amount of regular butter. This creates a topping with a uniquely tender texture and pronounced nutty flavor that complements the apples beautifully. The proteins and fats in the nut butter also promote exceptional browning, resulting in a deeply golden topping with irresistible aroma. This variation pairs exceptionally well with complementary flavors: try almond butter with a touch of cherry extract, cashew butter with a hint of maple, or peanut butter with a drizzle of chocolate sauce for serving.
7. The Oat Variation Technique
Elevate the textural experience of your Apple Crisp by creating a multidimensional topping that goes beyond traditional rolled oats. Create a mixture of three different oat textures: 1 cup rolled oats (traditional), 1/2 cup quick oats, and 1/2 cup oat flour (made by pulsing rolled oats in a food processor). This combination creates a topping with fascinating textural complexity: the rolled oats provide hearty chew, the quick oats absorb more butter for a tender middle layer, and the oat flour creates binding that prevents excessive crumbling when served.
For additional texture contrast, toast 1/2 cup of your rolled oats in a dry skillet until golden and fragrant before adding to the topping mixture. These pre-toasted oats maintain their crunch even after baking, creating delightful textural pockets throughout the topping. This technique results in a more sophisticated mouthfeel that elevates the entire dessert experience.
8. The Fresh Herb Infusion
Introduce an unexpected sophistication to your Apple Crisp by incorporating fresh herbs into both the filling and topping. For the filling, add 1 tablespoon of finely chopped fresh thyme or rosemary when seasoning your apples. These woody herbs contain aromatic compounds that complement and enhance the natural flavors of the apples, creating a subtle complexity that guests will notice without necessarily identifying.
For the topping, incorporate 2 tablespoons of finely chopped fresh sage into your butter before mixing with dry ingredients. During baking, the sage becomes crisp and releases its essential oils, creating aromatic pockets throughout the topping. This technique borrows from the Italian tradition of sage-infused brown butter, creating a sophisticated flavor profile that transforms this homey dessert into something worthy of fine dining. For maximum impact, garnish each serving with a small sprig of the fresh herb used in the dessert.
9. The Brown Butter Method
Transform your Apple Crisp with the nutty, complex flavor of brown butter incorporated throughout both components. For the filling, replace the regular melted butter with brown butter: simply cook butter in a light-colored saucepan over medium heat until the milk solids turn golden brown and the butter smells nutty and fragrant. This process creates hundreds of new flavor compounds that add remarkable depth to your apple filling.
For the topping, use brown butter in place of regular melted butter, but increase the quantity by 2 tablespoons to account for moisture loss during the browning process. The toasty, caramelized notes in the brown butter create a topping with exceptional flavor complexity and perfect golden color. This technique works particularly well with apple varieties that have subtle flavor profiles, as the brown butter enhances their natural sweetness without overwhelming it. For presentation, consider serving each portion with a small pitcher of warm brown butter sauce spiked with a touch of maple syrup.
10. The Texture Contrast Technique
Create an Apple Crisp with exceptional textural interest by deliberately incorporating multiple apple textures within the filling. Instead of uniform apple slices, prepare your apples in three different styles: 4 apples cut into 1/4-inch slices (traditional), 2 apples diced into 1/2-inch cubes, and 1 apple grated on the large holes of a box grater.
This technique creates a filling with fascinating textural diversity: the slices maintain some structural integrity, the cubes become tender but hold their shape, and the grated apple melts into an almost sauce-like consistency that binds everything together. Each bite delivers a different experience, making the dessert more engaging and sophisticated. For maximum impact, consider using multiple apple varieties with this technique, pairing firmer apples (like Honeycrisp or Braeburn) for the slices and cubes with softer varieties (like McIntosh or Golden Delicious) for the grated portion.
What to Serve Apple Crisp With:
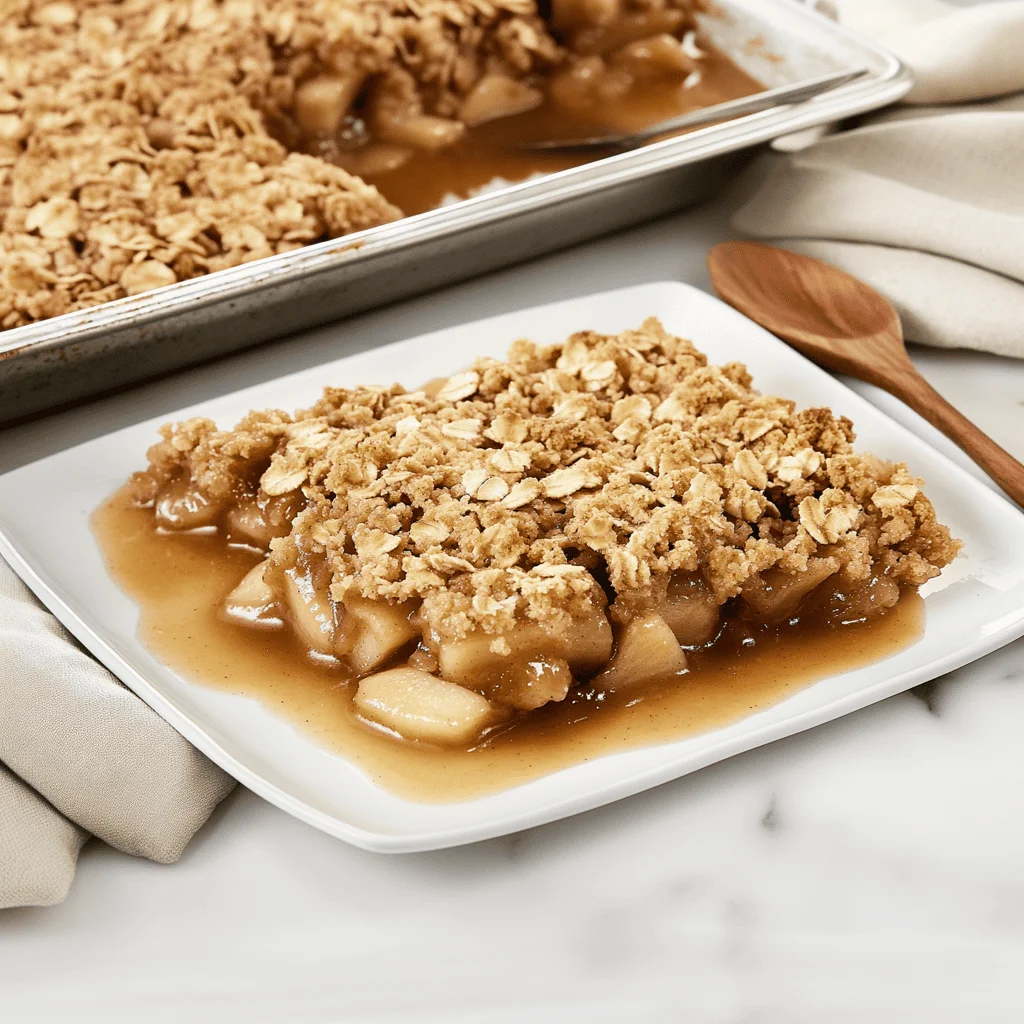
Transform your Apple Crisp from delightful dessert to memorable experience by pairing it with thoughtfully selected accompaniments. The classic partnership of warm Apple Crisp with cold vanilla ice cream creates that magical temperature contrast that enhances both components: the ice cream slowly melting into the warm crevices of the crisp creates rivers of creamy sweetness that’s simply irresistible. For an elevated experience, consider cinnamon or caramel ice cream, which amplify the dessert’s warm, spiced notes.
For a lighter option that still provides creamy contrast, freshly whipped cream infused with a touch of maple syrup and bourbon creates a sophisticated topping that melts beautifully over the warm dessert. A dollop of crème fraîche offers a tangy counterpoint that cuts through the sweetness, perfect for those who prefer less sweet desserts.
For beverage pairings, hot beverages create a cozy experience perfect for chilly evenings. A cup of black tea with hints of bergamot complements the fruit and spice notes, while spiced chai tea mirrors and enhances the cinnamon flavors. Coffee lovers will appreciate how a medium-roast coffee with caramel undertones harmonizes with the dessert’s buttery topping. For an adult indulgence, consider serving small glasses of aged rum, bourbon, or apple brandy, which echo and intensify the dessert’s warm, autumnal character.
Top Tips for Perfecting Apple Crisp:
Creating truly exceptional Apple Crisp requires attention to detail and understanding a few key techniques that transform good into extraordinary. For apple selection, embrace variety mixing apple types creates complexity no single variety can achieve. Combine firm, tart apples (Granny Smith, Pink Lady) with sweeter, softer varieties (Honeycrisp, Golden Delicious) for balanced flavor and texture. Always taste your apples before baking; adjusting sugar levels based on their natural sweetness ensures perfect balance.
Proper cutting technique dramatically impacts texture. For ideal consistency, maintain uniform thickness (about 1/4 inch) but varied sizes and shapes. This creates some pieces that completely soften while others maintain slight firmness for textural interest. Pre-cooking your apples briefly before adding the topping guarantees perfect doneness no more hoping the apples will soften before the topping burns!
For topping perfection, refrigerate your crumble mixture for 15 minutes before baking. This solidifies the butter, creating distinct clumps that develop fantastic textural contrast during baking. Use your fingertips (not a food processor) for mixing to maintain those desirable irregular pieces. For make-ahead convenience, prepare and refrigerate the topping up to three days before baking, or freeze for up to a month.
The baking vessel matters more than you might think. Choose a shallow, wide dish rather than a deep one to maximize the ratio of crispy topping to fruit. For individual servings that maximize edges (the most texturally interesting part), bake in ramekins or cast iron mini skillets. Most importantly, allow your finished Apple Crisp to rest 15-20 minutes before serving this resting period allows juices to thicken slightly and flavors to meld, dramatically improving both texture and taste.
Storing and Reheating Tips:
Proper storage techniques ensure your Apple Crisp maintains its delicious qualities even days after baking. For short-term storage (2-3 days), cover the cooled crisp loosely with foil and refrigerate. The loose covering prevents condensation from making the topping soggy, while refrigeration prevents fermentation of the apples. For single servings, transfer portions to airtight containers, keeping topping and filling together to maintain that perfect flavor meld.
For longer preservation (up to 3 months), freeze your Apple Crisp either before or after baking. For unbaked storage, assemble the crisp in a freezer-safe dish, cover tightly with plastic wrap and foil, and freeze. When ready to enjoy, bake directly from frozen, adding about 15-20 minutes to the baking time. For baked storage, cool completely, cover tightly, and freeze. Thaw overnight in the refrigerator before reheating.
Reheating requires care to restore the textural magic of freshly baked Apple Crisp. For whole crisps, reheat in a 350°F oven for 15-20 minutes until warmed through. Cover with foil for the first 10 minutes to prevent excessive browning, then remove the foil for the remaining time to re-crisp the topping. For individual portions, the oven method works beautifully at 350°F for 7-10 minutes. For quick enjoyment, microwave individual servings for 30-45 seconds until just warm, then place under the broiler for 1-2 minutes to restore crispness to the topping. This two-step approach provides the perfect balance of convenience and quality.
Apple Crisp Recipe 10 Ways to Elevate This Classic Autumn Treat
Course: BreakfastCuisine: American/RusticDifficulty: Intermediate8
servings15
minutes35
minutes287
kcalIngredients
7 medium apples (roughly 3 lbs.)
1 Tbsp. fresh lemon juice
1 1/2 cups light brown sugar (divided)
2 sticks melted butter (divided)
2 tsp. cinnamon (divided)
Kosher salt
2 cups old-fashioned oats
1 1/2 cups all-purpose flour
Directions
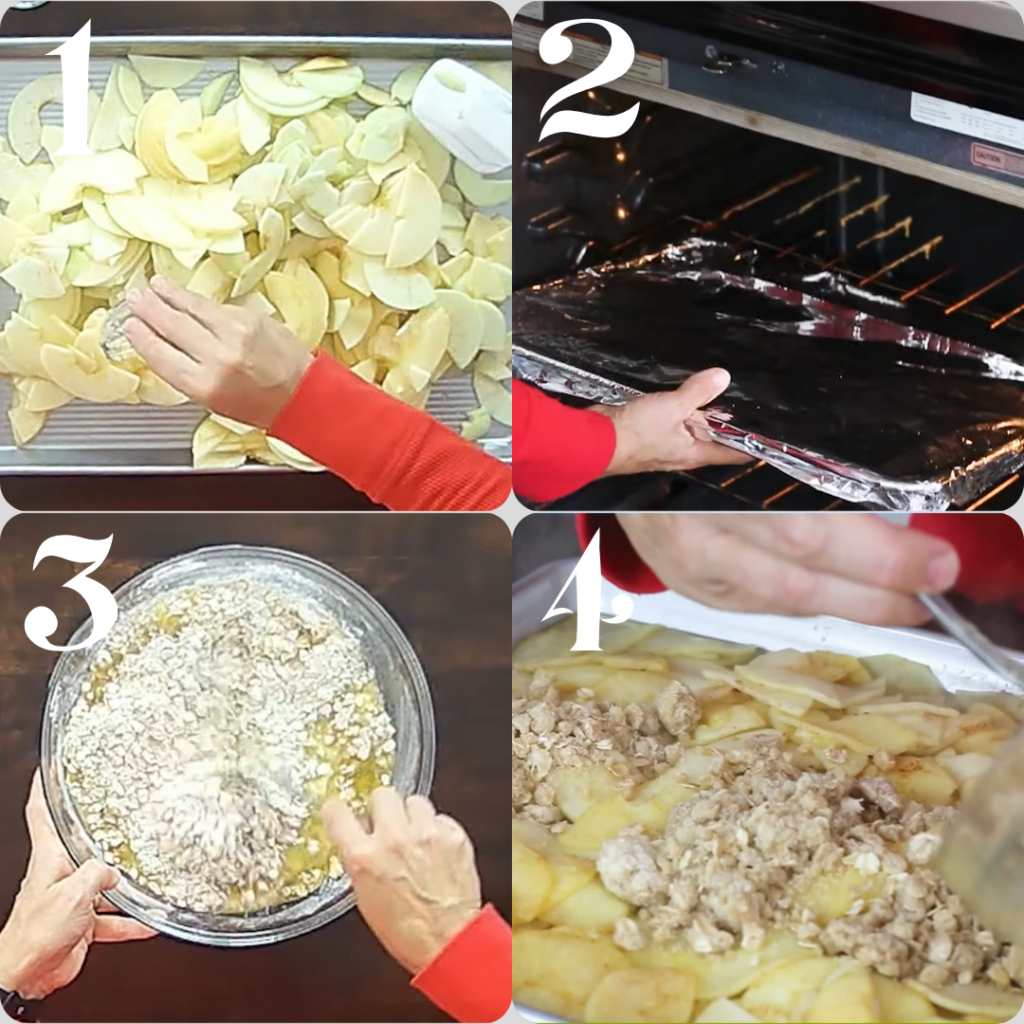
- Preheat oven to 425 degrees.
- Peel and core apples and then slice 1/4″ thick.
- Place apples on USA Pan Half Sheet Pan.
- Toss the apples with the lemon juice, 1/4 cup of the brown sugar, 2 Tbsp. of the melted butter, 1 tsp. cinnamon, and 1/8 tsp. salt.
- Cover with foil and bake for 20 minutes.
- While apples are baking, combine the oats, flour, remaining brown sugar, 1 tsp. cinnamon, and 1 tsp. salt.
- Break up any large lumps then stir in the remaining melted butter and stir with a fork until moistened and crumbly.
- Remove apples from oven and carefully remove foil.
- Scatter crumble on top and return to oven for 15 minutes.
- Cool for 10-15 minutes before serving to allow the filling to set slightly.
Nutrition Facts
- Calories: 287 kcal | Carbohydrates: 42g | Protein: 3g | Fat: 13g | Saturated Fat: 8g | Cholesterol: 31mg | Sodium: 168mg | Potassium: 175mg | Fiber: 3g | Sugar: 27g | Vitamin A: 432IU | Vitamin C: 5.2mg | Calcium: 28mg | Iron: 1.2mg
FAQs About Apple Crisp
What’s the difference between apple crisp, apple crumble, and apple cobbler?
While these three desserts share similarities, each has distinctive characteristics. Apple Crisp features a topping made with oats, creating a crunchy, streusel-like texture. Apple crumble, popular in British baking, traditionally contains no oats, resulting in a sandier, more cookie-like topping. Apple cobbler distinguishes itself with a biscuit-style topping that puffs up during baking, resembling cobblestones (hence the name). Each has its devotees, but Apple Crisp offers the most satisfying textural contrast between tender fruit and crunchy topping.
Can I make Apple Crisp ahead of time?
Absolutely! Apple Crisp performs beautifully as a make-ahead dessert. You can prepare the entire dish up to 24 hours before baking, keeping it covered in the refrigerator. For longer advance preparation, store the prepared filling and topping separately the filling in the refrigerator for up to 2 days, the topping in an airtight container for up to a week. Alternatively, assemble and freeze the unbaked crisp for up to 3 months, then bake directly from frozen, adding approximately 20 extra minutes to the baking time.
What are the best apples to use for Apple Crisp?
The ideal Apple Crisp comes from using a combination of apple varieties. For structure, include firm apples that hold their shape during baking, such as Granny Smith, Honeycrisp, or Pink Lady. These provide texture and tartness. Balance these with some softer, sweeter varieties like Golden Delicious, Gala, or Fuji, which break down more readily, creating pockets of velvety smoothness. This strategic combination ensures your crisp has complex flavor and textural interest, rather than uniform applesauce beneath the topping.
Why did my Apple Crisp turn out watery?
A watery Apple Crisp typically results from one of three issues. First, some apple varieties (particularly McIntosh and Red Delicious) release excessive moisture during baking. Second, skipping the pre-cooking step can prevent some moisture from evaporating before adding the topping. Third, cutting apples too small increases their surface area, releasing more juice. To remedy, toss your apples with 1-2 tablespoons of cornstarch or flour before baking to absorb excess moisture, pre-cook as directed, and maintain larger slices rather than small dice.
Can I make Apple Crisp without oats?
While oats are traditional in Apple Crisp, you can create a delicious oat-free variation. Replace the oats with an equal amount of chopped nuts (pecans, walnuts, or almonds work beautifully) for crunch, or substitute with an additional 1/2 cup of flour mixed with 1/4 cup of cornmeal for textural interest. For a more decadent option, create a streusel-style topping using equal parts flour, sugar, and cold butter cut into small pieces, plus a handful of crushed graham crackers for that essential crispy element.
How do I know when my Apple Crisp is done baking?
Perfect Apple Crisp doneness displays three key indicators. First, the topping should be uniformly golden brown, not pale or overly dark. Second, the filling should be visibly bubbling around the edges, indicating it’s reached the temperature needed for thickeners to activate. Third, when testing with a small knife, the apples should offer minimal resistance similar to the texture of canned fruit. If your topping browns before the filling is done, cover loosely with foil and continue baking until the apples reach perfect tenderness.
Can I reduce the sugar in this Apple Crisp recipe?
You can successfully reduce sugar in Apple Crisp with some adjustments. For the filling, you can decrease sugar by up to half, especially when using naturally sweeter apple varieties. In the topping, reduce sugar by no more than one-third to maintain proper structure and browning. Consider incorporating natural sweeteners like applesauce or mashed banana into the filling to maintain sweetness with less added sugar. Adding a teaspoon of vanilla extract or almond extract enhances perceived sweetness without additional sugar.
Why doesn’t my topping get crispy?
A topping that refuses to crisp typically stems from butter distribution issues or moisture imbalance. For perfect crispness, ensure your butter is completely melted but not hot when incorporated into the dry ingredients. Mix just until moistened, leaving some intentionally larger clumps for textural interest. If your topping seems very wet, add an additional 2-3 tablespoons of flour. During baking, place the dish on the upper-middle rack of your oven to encourage better browning and crispness, and ensure your oven is fully preheated before baking begins.
How can I make Apple Crisp more special for a dinner party?
Elevate your Apple Crisp to dinner party status with thoughtful presentation and flavor enhancements. Bake individual portions in ramekins or mini cast iron skillets for elegant presentation. Consider adding unexpected luxury ingredients like vanilla bean paste, a splash of aged bourbon, or a handful of dried sour cherries to the filling. For tableside drama, flame 1/4 cup of brandy or bourbon and pour over each serving just before adding ice cream. Garnish with delicate apple chips, candied nuts, or edible flowers for a restaurant-quality presentation that will impress dinner guests.
Can I make Apple Crisp without butter for dietary restrictions?
For dairy-free or vegan Apple Crisp, substitute the butter with equal amounts of coconut oil (for rich flavor) or high-quality extra virgin olive oil (for a sophisticated, slightly fruity note). Plant-based butters specifically formulated for baking also perform well. For the topping, add an extra two tablespoons of your chosen fat to compensate for the moisture normally provided by butter’s milk solids. Consider adding 2 tablespoons of nut butter to the topping as well this increases richness and helps achieve the golden-brown finish typically provided by the milk proteins in butter.
Conclusion
As the aroma of cinnamon and baked apples fills your kitchen, you’ll understand why Apple Crisp has endured as a beloved classic through generations. This dessert embodies everything wonderful about home baking it’s forgiving for beginners yet offers endless opportunity for creative interpretation by experienced bakers. The ten elevation techniques we’ve explored demonstrate how this humble dessert can range from comforting family treat to sophisticated dinner party finale.
What makes Apple Crisp truly special is its remarkable versatility. It welcomes adaptation based on seasonal availability, dietary needs, and personal preference. Whether you’re creating a traditional version that honors family recipes or experimenting with unexpected flavor combinations, the foundational elements tender apples and crispy topping provide a reliable framework for culinary creativity.
As you craft your own perfect version of Apple Crisp, remember that the most important ingredient is the attention and care you bring to the process. The slight adjustments in technique, the thoughtful selection of apples, and even the serving vessel you choose all contribute to creating not just a dessert, but a memorable experience for those fortunate enough to share it. So as autumn winds blow and apples reach their peak sweetness, take this opportunity to create a moment of warmth and connection through the simple yet profound pleasure of perfectly executed Apple Crisp.
For more seasonal dessert inspiration, check out my pumpkin spice latte recipe that offers similar opportunities for creative interpretation and family connection through food.

